
Running the GBPVR Program: Click to start the PVR program and select: Live TV.
If unable to select LiveTV or the viewing screen is just blank or red then your setup for the WINTV card is not correct yet. You should be able to watch the incoming video from your S-Video or composite feed. If you get a red screen go back to the PVR config and ensure that the program is using the correct video input.
That concludes the setup of the recording software.When you run the DigiLite CONFIG you will need to ensure that the four digit number in Video Bit Rate box is the same as the Bit Rate box of PVR CONFIG Edit Capture Settings window.. Go to the Recordings option.Choose Manual Recording from the sub-menu. If required change the start and stop times manually by highlighting the value and typing over it.Set it to start at (or even before) the current time. You should be able to record the video in an mpeg2 format.To monitor the recording go back to the main menu and select LiveTv and there will be an option to watch the recording.
We now need to read out the file (while it is still recording) via the PC's usb2 port using the DigiLite Transmit program.Ensure that the settings on the DigiLite CONFIG window are as shown on the left of this page.(the usb ports will vary. With the serialiser plugged in,find yours in Windows/control Panel/Hardware/Device Manager/System. Look under Ports). Close the Config window and click the DigiLite Transmit icon. A DOS style window should appear and the program should have found the recording location and start to read it out. On DigiLite Config enter the symbol rate and FEC required and the bit rate shown in DL Config is advising the value to be put into GBPVR Config. It you select various symbol rates and FECs, this value will change. Dont forget to clear out (i.e.delete) the recording files in the folder where you store them now and then! You can do this within the PVR program or directly with Windows Explorer.


GBPVR CONFIG: Follow the screen caps shown here from left to right to enter the required settings for the PVR program to use. After finishing the Config setup you can run the PVR program.
Country: Set for UK or wherever you are.
Board Number: Capture Device #1
Source: Composite, External Tuner (or S-Video External)
Quality Profile Settings: Highlight Medium Quality and click the Edit button (this will avoid you needing to make extra clicks when using the PVR program as it defaults to Medium).
Enter the following settings..
NTSC 720x480 / PAL 720x576
Constant (ticked)
Bit Rate 2094 (or the number given to you in the DigiLite Config )
(Peak will be greyed out)
Audio Bit Rate:192 k
Audio Sample: 48 Khz
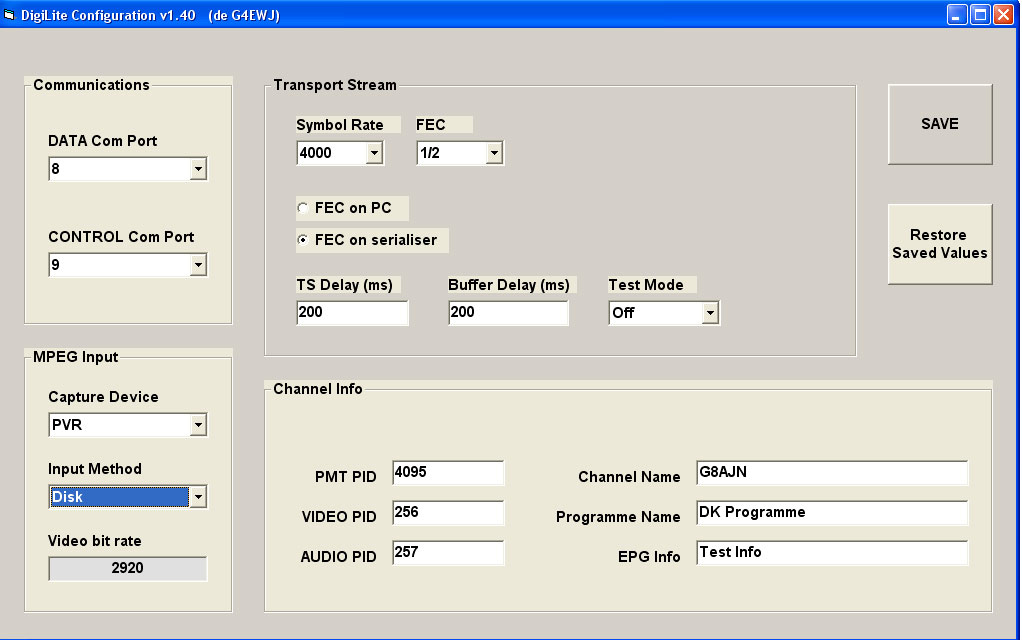
 DigiLite CONFIG (Click to zoom)