MAKE YOUR OWN PROTOTYPE
PRINTED CIRCUIT BOARDS
 |
|
|
Looking back over some recent copies of CQTV I was struck by the number of constructional items that were built with strip-board pcb. This is an obvious way to quickly prototype designs, but can be rather cumbersome and obviously will be tricky as more and more ICs go over to surface mount. One of the worst jobs in my view for the home constructor is the drilling of boards. Even quite simple boards can require dozens of holes, so the attraction of smd components all soldered onto the one side of the pcb requiring no drilling at all is clear.
PCB manufacturers are not interested in small runs and charge nearly as much for a couple of boards as for ten. So what other options are there? Photo-resist requires a negative sheet with a photographic surface painted onto a copper pcb. The process then requires a light-box and careful timing of exposure followed by a developing and then removal of unwanted material leaves a pcb ready for etching. Quite a few tricky processes and opportunities to fail.
I discovered a couple of years ago another option using an iron-on system. Discussing the product with some local operators I realised that many had never even heard of this way of producing boards. At first I was rather sceptical, particularly when it came to fine tracking, but I decided to give it a try and have found that Press N Peel is ideal for anyone with access to a laser printer or photocopier. Armed with a vector based computer drawing programme such as CorelDraw a simple circuit can be quickly prototyped. Of course a CAD program such as Eagle will do the work for you. A 1:1 scale picture in a magazine can be scanned into your pc if the quality of the original is good enough. Settings for the printout can be checked on paper first.The settings for the printer should be 'print colors as black' and 'mirror'. (selected on the printing options via the drawing program). Press NPeel Sheets are available at several suppliers such as Maplin, CPC and on Ebay*.
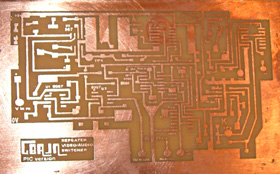
By way of a demonstration I will briefly take you through the process of the design and making of a circuit board for the local ATV repeater GB3SQ a few years ago..
|
|
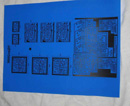
| The blue A4 sized PressNPeel sheets have a shiny side and a dull, coated side. It is this coated side that is printed on with a mirror image of the track layout. Use the printer options from CorelDraw etc to set all colours as black and mirrored. Dont use scale to fit etc as you need the sizes to remain unchanged at 1:1. |
 |
|
| This cannot be done with an inkjet printer, but a laser printer or photocopier work equally well. The toner has to be fused with heat onto the sheet to mix with the impregnated chemicals. It is not necessary to etch from the whole sheet at once, a sharp knife or scissors can be used to cut out a single image.Store the remnants in a air-tight plastic bag. |
 |
|
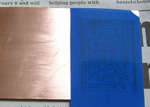
| Using light pressure, clean the copper surface with some fine wet/dry paper.Acetone (nail varnish remover) wiped over the surface should clear any grease/fingerprints etc.Don't use any cleaning liquids.The very clean pcb copper board is then laid flat with the dull (printed) side of the sheet touching the copper and use a smoothing iron (set temperature to around ‘silk’ setting) is gently wiped across the area of the design until the copper is heated to a point where the chemicals on the sheet deposit the toner onto the board rather like using an iron-on transfer.It takes quite a while if using a lot of copper as it acts as a heat sink. Don't over-press, keep the pressure to about the weight of the iron itself and concentrate on any large ground areas and corners. |
 |
|
| Allow about 5-10 minutes ironing for a board of about 100mm x 100mm, less if smaller. If the temperature is too high the blue plastic sheet will start to crinkle. Ensure that there is a fairly even heat across the board but there is no need to press hard as that will tend to make the finer tracks splay wider. |
 |
|
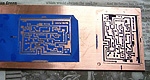
| After ironing for five minutes, allow to cool a few minutes and gently peel back the transfer sheet from a corner, looking for any tracks that may not have transferred fully. If there are any, simply let the sheet back down and iron for a few more minutes then repeat. Cool the board gently with cold water, or by waiting, down to room temperature then gently peel off the sheet. Any spots missing can be repaired by a Etch Resist Pen before etching. |
 |
|
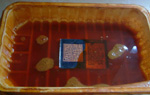
| An etch resist pen can be used for odd spots that need attention in large ground areas or to increase the saved area of copper for example.Nail varnish is ideal for large areas.If you are using double sided board you can cover the lower side with nail varnish at this stage.Etch as usual with ferric chloride crystals (about a heaped tablespoon to 1/2pint [300ml] depending on area of exposed copper to deal with) and hot, but not boiling (dangerous chlorine fumes), water, sufficient to submerge the board. Ferric Chloride stains fingers and clothes. |
 |
|
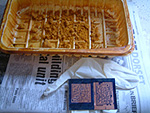
Wear old clothing as F.C. stains permanently.Use latex gloves and a plastic tray (such as those use in supermarkets for whole chickens) cover it with cling film to protect clothes from staining splashes and agitate the mixture vigorously to get air bubbles into the ferric chloride and to prevent any etched copper settling back onto the board..
After 10-15 minutes or so the board will be etched.If it is going a bit slowly because the liquid has cooled, you can remove the board, rinse it under cold water tap and place the etchant tray in the microwave for 10 seconds or so to re-warm the liquid. |
 |
|
 |
Rinse under cold water. The etch resist can be removed with Jif cream and wire wool or wet/dry paper. If not being assembled that day the resist should be left on to protect the copper tracks and removed when needed and the board placed into a sealable plastic bag. To tin the board you will need a small artwork brush (~10mm) and some solder paste which should be stored in a cool place. When buying, ensure that it is solder paste not soldering flux which some Ebay sellers seem to confuse . Brush it over the tracks and use a hot air blower to flow the solder. YouTube has some examples of this to watch. When disposing of used FC remember it will stain clothes and metals incl.cutlery if it splashes, so take care. |
|
|
| Double sided boards are makeable with care, you will need to varnish the unprinted side to avoid etching it away. If you wish to try double sided tracking then you will need to varnish the etched side while the other side is printed and etched.Tricky, but it can be done. |
|
|
| |
|
|
| You can place a number of different (or even the same) designs on an A4 sheet. The better CAD programs allow you to fit as many as possible on to a sheet using the 'Panelise' option. |
|
|
| * Depending upon where you get your sheets from you may find some of the imported sheets are slightly smaller and a fraction thinner.If the sheets snag inside your printer as they pass the heated rollers, try placing the sealed plastic bag with the sheets inside into a fridge for 20 to 30 minutes before using them. Never buy sheets from anywhere unless you are sure that they are 'fresh' stock as results will be poor and rather patchy unless the chemicals on the blue sheet are fresh. |
|
|
  |
|
| |
| |
| |